I’m going to explain this in relation to WordPress, but the principle is broadly the same in several other contexts. It’s very straightforward, but it’s the part in point 7 below that is the thing that you really need to know to make it work.
- Go to the YouTube page where your favourite clip is
- Press the ‘share’ button
- Press the ’embed’ button [note – some clips don’t allow embedding, and this is the point at which you’ll find out]
- Pick a frame-size from the four different sizes shown. For embedding in a web-post like this, I usually pick a small one so that it fits within post size, but you can always go back and alter it later.
- For safety, pick ‘Use old embed code’ – it usually works with anything
- Now click in the box with the blue highlighted code, select all of it and copy it.
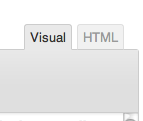
 Go to the place where you want to embed the video, and select ‘HTML’ or ‘Code’ (sometimes shown as < > ona tool bar). In WordPress it looks like the tabs on the left – press the ‘HTML’ tab and it will stop being greyed-out. Find the end of the HTML code, and paste in the code from Youtube
- Press Visual again – and you’ll see a shaded box where the YouTube clip will be once you’ve saved and uploaded.
- If you’ve made a mistake about the size, go back to YouTube and select a different frame-size, and re-select and copy the code from the code box.
- Here’s a screen shot of what the ’embed’ part of Youtube looks like:
And here’s the result:


Was this just an excuse to share the hilarious subtitling on your chosen clip? 🙂
Of course. This clip should be compulsory viewing for everyone in the world.