If all you want to do with your music is play it on your computer or phone, the iTunes default setting which imports music files as AAC (Advanced Audio Coding) is fine. It’s the the standard format for Apple products and several others, and is supposed to be better in quality than MP3.
But life gets more difficult if you want to do anything else with it – like edit it in Audacity, for example, or send it to someone who hasn’t got a device that can play AAC files, or transfer it to one of your own devices that doesn’t like AAC. In this case, you’re better off using MP3. You might just want to convert a single song to MP3 for a particular task, while keeping the rest of your library as AAC.
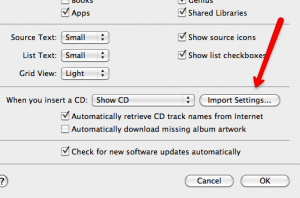
Here’s how you can do it for free in iTunes – no need to pay money for ‘format converters’. It’s the same procedure that you’re offered when you first put a CD into iTunes – there’s a button in the bottom RH corner of the screen called ‘Import settings’. The point about this tip is to show you how to apply the procedure retrospectively, even after you’ve already imported the CD. The instructions below are for a Mac, but the principle would be the same on a PC.
1. Open iTunes and go to the Preferences menu
2. From the ‘General’ tab, select Import settings (see below)
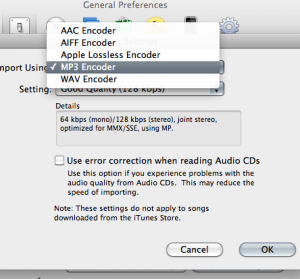
3. From the menu that appears, select MP3 Encoder (obviously, if that’s already selected, you don’t need to do anything!). The other settings don’t so much matter, though ‘Good quality 128kbps’ is quite enough for most purposes.
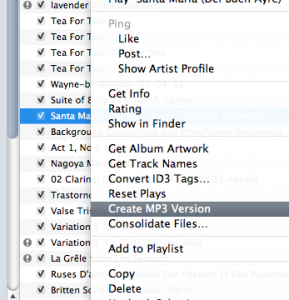
4. Now you’ve done that, go back to your library, and select the track that you want to convert to MP3, and CTRL-Click on it. A shortcut menu will appear. Scroll down it until you find ‘create MP3 version‘ (see below)
5. In your library, a new track will appear with exactly the same name as the original, but with a newer date in the ‘date added‘ column – so if you can’t find it, sort this column to bring it to the top or bottom of the list. It’s a good idea to rename this track putting ‘Mp3 version’ in the title, so that it’s clear which track is which.
6. In the folder where your iTunes library is kept, there will now be two versions of the file, one in the original AAC format, the other (newer) one in MP3.
NOTES
- If you want to retain your library in AAC format, remember to switch back the preferences after you’ve finished this task.
- iTunes removed this capability from one version of the program, but it’s come back again in the latest version. I can’t guarantee that they won’t remove it again – it’s just too good to be true, frankly.
- Converting to MP3 or AAC results in a certain loss of quality, so choosing to convert AAC or MP3 back to WAV or AIFF is not going to improve the quality – it would just be like putting Cadbury’s chocolate in a Charbonnel et Walker box. However, if you know that you are eventually going to use the track for a show, where the highest possible quality is desirable, remember to import the CD as WAV or AIFF in the first place, or get the CD and re-import it as WAV/AIFF.
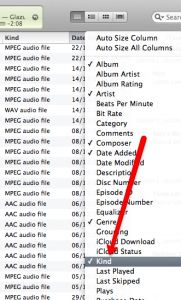
- If you’re the kind of person who has a library full of things called ‘Track 1’, it’s a good idea to name the track you’re going to convert to MP3 first, so that it’s easy to find the new track in your library. If you’re not sure which track is which, CTRL-click on any of the columns in the browser to add more columns, and select ‘Kind’ so that you can see what format the file is in.


Can you still do this with the latest version of ITunes?
I’m going to check and get back to you!
Yes you can – still looks exactly the same on the current iTunes to me. Doesn’t it on yours?